
My hydrangea plant died last summer after a few weeks of no rain. The hydrangeas at my mother-in-law’s house lived, but I’m not so sure they are going to bloom like they have in summers past. To rectify this problem I decided to make my own blooms.

Thank you Glory over at Glorious Treats for such a fantastic idea. I didn’t even need to know what kind of cupcake she used as her canvas. I only had eyes for the frosting, which is unusual for me, since I’m a HUGE fan of cake. To achieve this hydrangea look for your cupcakes you are going to need:
* 12-18 Cupcakes (You don’t even want to know what kind of cupcakes I ended up making. I’ll just say…they tasted out of this world delicious but since they were a little “involved” I’ll just keep this post about the frosting.)
* One batch of your favorite butter cream or cream cheese frosting (recipes follow – I used both because I ran out of the butter cream before I got all of the cupcakes frosted – I highly recommend Glory’s cream cheese. It tastes great yet has the density needed to retain it’s shape after it’s been piped.)
* Food coloring in the colors you would like your hydrangeas to be – I used blue and violet
* One pastry bag
* One Wilton 2D or other brand large closed star tip


Separate you frosting into three small bowls with one bowl containing a little less frosting than the other two – the bowl with the lesser amount is to remain white. Using your food coloring, color the other two bowls of frosting to your liking.
Put your decorating tip into the pastry bag and then insert the tip-end of the pastry bag into a tall cup.

Open the bag and fold the top over the edge of the cup. This allows you to fill the bag without having to hold onto it.

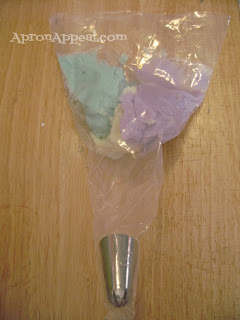
Fill the bag with a large scoop of the blue frosting, another scoop of the same size with the purple frosting and use a slightly smaller spoonful for the white frosting.

Take the pastry bag off the cup and evenly press the frosting down to the tip. Start piping the frosting into one of the bowls of frosting until you are able to get an even consistency or all three colors begin to come out of the tip.


Begin frosting the cupcake by piping a large star in the center of the cupcake. This will enable you to create “stadium seating” for your pedals.
Next, fill in around the large star by piping new smaller stars all around it - start at the center and work outward to the edges until the entire cupcake is finished.

This piping method is a great place for beginners because the overall design is completely forgiving. I even let my kids try it. If you go that route, don’t forget to tie off the end of pastry bag, kids have a hard time keeping a loaded pastry bag twisted shut.
Butter Cream Frosting
Yield: 3 cups
Ingredients:
½ cup solid vegetable shortening
½ cup unsalted butter, softened
1 teaspoon vanilla extract
4-5 cups confectioners’ sugar
2 tablespoons milk*
Directions:
- In large bowl, cream shortening and butter with an electric mixer. Add vanilla. Gradually add sugar, one cup at a time, beating well on medium speed. Scrape sides and bottom of bowl often. Once the sugar is incorporated to your desired consistency (err on the stiff side) icing may appear dry. *Beat in milk, a little at a time, until frosting is light and fluffy. Keep bowl covered with damp cloth until ready to use. For best results, keep icing bowl in the refrigerator when not in use. Refrigerated in an airtight container, this icing can be stored 2 weeks. Rewhip before using-add milk if needed.
Cream Cheese Frosting
Yield: 3 cups
Ingredients:
½ cup (1 stick) unsalted butter, softened
8 oz. cream cheese, softened
4-5 cups confectioners sugar
1-4 tablespoons heave cream (or milk if you are in a pinch)
Directions:
1. Place butter in a large mixing bowl and blend slightly. Add cream cheese and blend until combined, about 30 seconds.
- Add vanilla extract and powdered sugar and blend on low speed until combined. Increase to medium speed and beat until it begins to get fluffy.
- Slowly add the heavy cream, a little bit at a time until desired consistency is met. (Don't add too much if you want the frosting to stay in place when piped on cupcakes.)
- Beat until fluffy, about 1 minute.
- Use at once or keep refrigerated. (This frosting will keep well in the refrigerator for several days, but you may need to re-beat it for the best texture.)
Notes: Glory has several flavor variations of this recipe on her blog. Since I’ve never made them I’m not posting them, but I look forward to trying a few out when my frosting needs call for it.
Gwenevere

14 comments:
Lovely! They turned out so pretty. Doesn't it make you feel happy when something turns out so well?
Sooo pretty!! Love them! I just planted a hydrangea bush a couple of days ago. We had had one at our first house and loved it. Thanks for the tutorial on the icing too. I make tasty cupcakes but I'm still working on making them pretty too. :)
WOW Gwen, these are just so pretty. they look like real hydrangeas. your piping skills are so good!!!
These blooms are beautiful, those are one of my favorite plants ever. I'll have to try this sometime, looks like fun.
these are gorgeous!
These bloomin' cupcakes beautiful! I love the color combo! Niiiiiiiiice=)
They're beautiful! I love all the colors on them. You did a beautiful job.
Holy gorgeous cupcakes! Love the color and the concept.
These caught my eye right away. I have about 30+ hydrangeas in my yard. I am going to attempt making them but I am horrible at piping so not sure how it will go. Thanks so much for sharing this lovely recipe and your piping techniques.
These turned out BEAUTIFULLY! I'm sure they're tsty too! You have tons of great recipes here~wonderful blog.
Have fun making the necktie cookies~if you do:)
Beautiful yes but to taste is divine
Holy cow those are so pretty! They look just like a hydrangea! I love how you've left the icing variegated in the piping bag so each petal has its own unique color and variations. Awesome! you have a great blog, I'm glad I found it!
Thanks Andrea what wonderful things to say. I hope you enjoy your time trolling around.
OMG!! Everything about this is incredible!!! Beautiful work!!!
Post a Comment